Table of Contents
Abstract
The Technical University of DOrtmund COMPression Framework, tudocomp, is a lossless compression framework with the aim to support and facilitate the implementation of novel compression algorithms. It already comprises a range of standard data compression and encoding algorithms. These can be mixed and parameterized with the following uses in mind:
- Baseline implementations of well-known compression schemes.
- Detailed benchmarking and comparison of compression and encoding algorithms.
- Easy integration of new algorithm implementations.
Philosophy
The framework offers a solid and extensible base for new implementations. It is designed so that most individual processes are modularized and interchangeable. This way, the user can mix and match algorithms to find the optimal compression strategy for a given input. The framework gives this opportunity while creating as little performance overhead as possible.
Compressors and Coders
Compressors, in terms of this framework, transform an input sequence (of bytes or characters) and write the result to an output. Each compressor is also required to implement a decompressor that can restore the original input losslessly from the compressed output. Apart from this, there are no strict rules as to what kind of transformation of the input occurs.
Coders serve for encoding primitve data types into a bit sequence with limited context (contrary to compressors, which may randomly access the entire input sequence). To this end, coders conceptually form the end of a compression chain by producing the final output bit sequence. A coder may receive additional information by a compressor in order to be able to encode data more efficiently (e.g. value ranges for bit-optimal encoding or even an alphabet distribution for low-entropy encoding). Analogously to compressors, every coder must be accompanied by a matching decoder.
By design, a coder can also be used as a compressor.
Modularity
Compressors and coders form a subset of our concept of algorithms. Any non-trivial type to be exposed to users by tudocomp shall be seen as an algorithm.
Algorithms shall be implemented in a modular way. Modules shall be interchangeable, so any task or subtask may be approached using different strategies.
For instance, picture a compression algorithm that consists of more than one step to achieve its compression or decompression. If each step could be seen as a module that may solve its sub-task in different ways, it qualifies for modularization.
To achieve this kind of modularity, the use of C++'s meta programming features (namely templates) is heavily encouraged. tudocomp is designed in a way that allows template parameters to be populated seemingly at runtime.
Furthermore, compressors and coders can be chained so that the output of one becomes the input of another.
Library and Command-Line
The framework consists of two major components: the compression library (often used synonymously with tudocomp in this document) and the command-line application (tdc).
The library contains the core interfaces and provides implementations for various compression algorithms. It is fully functional for use in third-party applications.
Using tdc (the commmand-line application), tudocomp's implementations can be invoked from a shell.
The interface between tudocomp and tdc is the registry. Every registered algorithm is exposed to tdc with a unique identifier specified by its implementation. The Registering Algorithms section describes how to register algorithms for tdc.
Features
tudocomp includes the following set of features:
- Flexible template-based interface for algorithms (e.g. compressors or integer encoders)
- Registry for easy exposition to the
tdccommand-line tool - Definition of parameters that can be passed (e.g. via the command-line)
- On-the-fly population of template parameters for easy exchangability of strategies and other modules (also via the command-line)
- Registry for easy exposition to the
- Simple interface for compressors
- Powerful interface for integer encoders
- Possibility to receive context information from compressors, such as integer value ranges or the input alphabet, for more efficient encoding capabilities
- Arbitrary-width integer vectors and bit vectors
- Bitwise I/O
- Measurement of running time and heap allocation in freely definable and nestable code phases
- Implementations of text data structures, including
- Suffix array (using
divsufsort) and inverse - LCP array and its pre-stages (Phi array and permuted LCP)
- Burrows-Wheeler transform and LF table
- Optional bit-compression either during or after construction
- Suffix array (using
- Implementations of various integer encoders, including:
- Binary and unary encoding
- Elias-Gamma and -Delta encoding
- VByte coding
- Huffman coding
- Human-readable ASCII representation for debugging purposes
- Custom static low-entropy encoding (SLE)
- Implementations of various compression algorithms, including:
- LZ77 using a sliding window or the LCP array
- LZ78 with exchangeable trie structure
- Run-length encoding
- Custom variants of LZ77 (lcpcomp) and LZ78 (LZ78U) (see here)
- Utilities for swift unit test implementation
- String generators for testing and benchmarking purposes
- Random strings with uniform character distribution
- Fibonacci words
- Thue-Morse strings
- Run-Rich strings (Matsubara et al.)
- Scripts for downloading a text corpus for testing and benchmarking purposes
- Tools to compare running time, heap memory usage and compression ratio of different compressor suites (tudocomp as well as third-party) on a freely definable set of inputs
Usage
This section describes the usage of tudocomp as a C++ library and as a command-line tool, respectively.
Building
The framework is built using CMake (3.0.2 or later). It is written in C++14 with GNU extensions and has been tested with the gcc compiler family (version 5.4 or later) and clang (version 3.4 or later). The build process requires a Python interpreter (3 or later) to be installed on the system (py scripts are invoked directly).
When these requirements are met, the following chain of commands on a clean clone of the project suffices to build tudocomp:
$ mkdir build && cd build
$ cmake ..
$ make
Note that tudocomp is configured for a debug build by default. The build type can be changed by passing the CMAKE_BUILD_TYPE corresponding parameter to CMake:
- Debug build (default):
cmake -DCMAKE_BUILD_TYPE=Debug .. - Release build:
cmake -DCMAKE_BUILD_TYPE=Release ..
For benchmarking purposes, the Release configuration is heavily recommended, as it will tell the compiler to perform numerous optimizations.
Dependencies
tudocomp's CMake build process will either find external dependencies on the system if they have been properly installed, or automatically download and build them from their official repositories in case they cannot be found. In that regard, a proper installation of the dependencies is not required.
Said external dependencies are the following:
- SDSL (2.1 or later).
- Google Logging (glog) (0.34 or later).
Additionally, the tests require Google Test (1.7.0 or later).
Documentation Build Requirements
For building the documentation, the following tools need to be installed:
Windows Support
While tudocomp has no explicit support Windows / Microsoft Visual C++, it is possible to use the Bash on Ubuntu on Windows with next to no feature limitations. However, note that the comparison tool relies on valgrind, which is not functional in this environment until the Windows 10 Creators Update 2.
Command-line Tool
The executable tdc is the command-line application that bundles all compression, encoding and other algorithms contained in tudocomp. It provides a fast and easy way to compress and decompress a file with a specified compressor or chain of compressors.
It contains a common help output that can be accessed by passing --help. Furthermore, the aforementioned set of algorithms that are available for use via the command-line can be listed by passing --list.
The following are typical ways to use tdc and should give an idea about how to use it. The example is using a simple LZ77 compressor and human readable encoding.
- Compress
file.txt, write tofile.txt.tdc: $ tdc -a "lzss(coder=ascii)" file.txt- Compress to a specific output file, overwrite if it exists:
$ tdc -a "lzss(coder=ascii)" file.txt -fo out.tdc- Decompress a compressed file, print to stdout:
$ tdc -d out.tdc --usestdout- Decompress using a specific decompressor, print to stdout:
$ tdc -d -a "encode(coder=ascii)" --stdout- Print the 10th Fibonacci word to stdout:
$ tdc -g "fib(10)" --usestdout- Compress the 10th Fibonacci word, print to stdout without header:
$ tdc -g "fib(10)" -a "lzss(coder=ascii)" --raw --usestdout
Chaining
Compressors and coders can be chained so that the output of one becomes the input of another.
- Chain the Burrows-Wheeler transform of a file into run-length, move-to-front and Huffman coding:
$ tdc -a "bwt:rle:mtf:encode(huff)" file.txt
Registering Algorithms
In order for algorithms to become available in the tdc executable, they need to be registered. The registry is generated by the build system and its contents are determined by a Python configuration script, which will be described in this section.
The default registry configuration is found in etc/registry_config.py. It includes a wide range of algorithms implemented in tudocomp. In some cases during development, one might want to work with a more lightweight version of tdc that only contains certain algorithms crucial to the area of research (which greatly reduces the compilation time as well). For these cases, a custom registry can be used by passing the -DTDC_REGISTRY=<PATH> to cmake, where <PATH> is the (absolute) path to the respective configuration script.
Registry configuration scripts ultimately produce the following outputs:
tdc.compressorsdetermines which compression algorithms are available for the-aoption oftdc.tdc.generatorsdetermines which input string generators are available for the-goption oftdc.
These outputs are list variables that contain AlgorithmConfig tuples, each of which determines a single algorithm to expose with the following settings:
name: The (canonical) class name of the algorithm to expose. Note that thetdc::namespace specifier may be omitted.header: The path to the header file in which the class is defined, relative to the project'sincludedirectory.sub: A list of lists of nested algorithm configurations. The semantics here are that for each strategy defined by the algorithm (see Strategies section), there is a list of allowed algorithm selections, which by themselves are defined using algorithm configurations. The order of the strategies in thesublist must equal the order in which the algorithm defines them in its meta information object.
Since many algorithms share certain types of strategies (e.g. most compressors accept an encoding strategy), the allowed selection for these are defined once in a variable before the aforementioned output variables, making use of the advantages that come from the fact that the configuration is a Python script.
The predefined config_match function can be used to create registry items only if a certain pattern exists in the generated config.h file. This file contains definitions regarding optional dependencies of tudocomp (e.g. Boost).
Library
In order to use tudocomp as an external library in another application, the following steps are necessary:
- Build tudocomp
- Point the compiler to the
includedirectory for includes - Statically link
<build_dir>/src/tudocomp_stat/libtudocomp_stat.a(where<build_dir>is the location where tudocomp has been built in)
Note that the aforementioned dependencies need to be linked as well.
The Doxygen documentation provides an overview of the framework's full API, including the contained compression and encoding implementations.
License
The framework is published under the Apache License 2.0.
Tutorial
This section provides a guided tour through some of the core features of tudocomp.
Please note that more detailed information about the use of specific classes or methods can be found in the Doxygen documentation.
Hint: Most code snippets can be seen "in action" in the directory
test/doc_snippets. These can be used as a reference. The source code file name is printed below the respective code snippet. Note that the snippets are implemented as unit tests, while this document will only show the didactically relevant parts.
Unit Tests
Because the documentation snippets are implemented as unit tests, this first section gives a brief overview over how these are hooked. The unit tests are powered by the Google Test library. Note that an explanation of the Google Test API is not part of this documentation. However, tudocomp provides some test helpers that will be presented in the respective sections.
Registering and running unit tests
All test sources are located in the test directory in the repository root. The test source files categorize unit tests into test suites and are registered in the CMakeLists.txt file.
The generated Makefile contains a target for each registered test suite. For example, the command-line make tudocomp_tests (from a build directory) invokes the tudocomp_tests suite, which is contained in tudocomp_tests.cpp.
The following global test targets are available:
build_check- tries to compile (not run) tudocomp and all testscheck- executes all registered test suites in successionmatix_tests- runs all registered compressors with all registered combinations of coders, strategies, etc. on a collection of small border-case test strings. Each test inmatix_testshas a unique label given by the arguments passed to a compressor. The tests can be restricted by the global environment variableMATRIX_PATTERN. For instance,MATRIX_PATTERN='string_coder = huff' make matrix_testonly runs those combinations whose label containhuffas astring_coder.
The sandbox_tests suite is ignored by the framework's repository and can be used for quick developmental tests to avoid the registration procedure. It can also be used as a template for new test suites.
Google Test suites are usually run completely, continuing even in case a single test fails. In order to terminate the test once a failure occurs, the --gtest_break_on_failure flag can be passed to the make target as a command-line parameter. This can be useful for debugging with gdb.
Input and Output
tudocomp provides an abstraction for handling input from different kinds of sources and output to different kinds of targets. These are straightforwardly named Input and Output. Both hide the actual source or target of the data (e.g. a file or memory buffer).
This section will describe their usage briefly along with some examples.
Reading an Input
An Input can be created from different data sources:
- a memory pointer (e.g. a string literal),
- a byte buffer (
std::vector<uint8_t>), - a file or
- an input stream (
std::istream)3.
For each type of data source, the Input class provides a corresponding constructor:
// Create an Input from a string literal
Input input_from_string("This is the input text");

// Create an Input from a given byte buffer (std::vector<uint8_t>)
Input input_from_buffer(buffer);

// Create an Input from a file
Input input_from_file(Path("example.txt"));

// Create an Input from a given std::istream
Input input_from_stream(std::cin); // from stdin
The input can be accessed in two conceptually different ways:
- As a stream, so that bytes are read sequentially from the input source (the concept of online algorithms) or
- as a view, providing random access to the input source like to an array of bytes (the concept of offline algorithms).
The choice is done by acquiring the respective handle using either the as_stream or the as_view function. The stream object returned by as_stream conforms to the std::istream interface and also provides iterator access. The View object returned by as_view provides the indexed access [] operator for and the function size to return the amount of bytes available on the input.
The following code snippet demonstrates using a given input as a stream:
auto istream = input.as_stream(); // retrieve an input stream

// read the input character-wise using a range-based for loop
for(uliteral_t c : istream) {
    // ...
}
The type uliteral_t is one of tudocomp's core types and shall be used for single characters.
In contrast, The following code snippet demonstrates using an input as a view:
auto iview = input.as_view(); //retrieve an input view

// compare the view's content against a certain string
ASSERT_EQ("foobar", iview);

// create a sub-view for a range within the main view
auto sub_view = iview.substr(1, 5);

ASSERT_EQ("ooba", sub_view); // assertion for the sub-view's contents

// iterate over the whole view character-wise in reverse order
for (len_t i = iview.size(); i > 0; i--) {
    uliteral_t c = iview[i-1];
    // ...
}
The types len_t and len_compact_t are another instance of tudocomp's core types. They shall be used for lengths and indices derived from the length of an input.
len_t shall be used for single variables, and len_compact_t for elements of an array or vector.
The functions as_stream and as_view can be used arbitrarily often to create multiple streams or views on the same input, e.g., in case the input is to be streamed more than once.
Producing an Output
An Output can be created for different data sinks:
- a byte buffer (
std::vector<uint8_t>), - a file or
- an output stream (
std::ostream).
Like Input, it provides a constructor for each type of sink:
// Create an Output to a given byte buffer (std::vector<uint8_t>)
Output output_to_buffer(buffer);

// Create an Output to a file:
Output output_to_file1(Path("example.txt"), false); // do not overwrite if exists (default)
Output output_to_file2(Path("example.txt"), true); // overwrite if exists

// Create an Output to a given std::ostream
Output output_to_stream(std::cout); // to stdout
An output has to be generated sequentially and thus only provides a stream interface via the as_stream function. The following code snippet demonstrates this by copying an entire input to an output:
auto istream = input.as_stream(); // retrieve the input stream
auto ostream = output.as_stream(); // retrieve the output stream

// copy the input to the output character by character
for(uliteral_t c : istream) {
    ostream << c;
}
Bitwise I/O
The framework provides the classes BitIStream and BitOStream for bitwise input and output. They are wrappers around std::istream and std::ostream, respectively, and provide functionality to read or write single bits or fixed-width (MSBF order) integers from their underlying stream.
Single bits are written using write_bit, integers using write_int.
The following example performs several bitwise write operations on an output:
{
BitOStream obits(output); //construct the bitwise output stream

obits.write_bit(0);     // write a single unset bit
obits.write_bit(1);     // write a single set bit
obits.write_int(27, 5); // write the value 27 using 5 bits (11011)
obits.write_int(27, 3); // write the value 27 using 3 bits (truncated to 011)

int a = 27;
obits.write_int(a); // write the value 27 using 8*sizeof(int) bits (32)
                    // (00000000000000000000000000011011)

uint8_t b = 27;
obits.write_int(b); // write the value 27 using 8*sizeof(uint8_t) bits (8)
                    // (00011011)

} // end of scope, write EOF sequence and destroy bit output stream
There is important logic in the destructor of BitOStream: Since the stream writes bits to an underlying byte stream, it needs to write a few extra bits at the end of the stream in order to indicate the end for an eventual bit input stream.
Note how write_int will use the default size of the passed integer's type if no bit width is explicitly passed in the second argument.
The following example performs several bitwise read operations from an input:
BitIStream ibits(input); // construct the bitwise input stream

bool bit = ibits.read_bit(); // read a single bit

uint8_t  a = ibits.read_int<uint8_t>(5); // read a 5-bit integer into a uint8_t
uint16_t b = ibits.read_int<uint16_t>(); // read a 16-bit integer
Note how read_int requires a template parameter in order to "know" into which data type the read integer will be stored and perform the respective conversion. If no bit width is given, the default size of the data type will be used.
Beyond writing single bits and fixed-width integers, the bit I/O features some universal integer encodings:
- Unary code (
write_unary/read_unary) - Elias gamma code (
write_elias_gamma/read_elias_gamma) - Elias delta code (
write_elias_delta/read_elias_delta) - Compressed integers (
write_compressed_int/read_compressed_int)
Arbitrary-Width Integer Vectors
tudocomp provides types and classes to allow the use of arbitrary-width integers and vectors thereof. These are not limited to a default widths of 8, 16, 32 or 64 bits, but can be stored using any amount of bits as necessary.
The template class uint_t is used to store single arbitrary-width integers. For instance, the specialization uint_t<40> can be used to represent values up to 240-1. uint_t typically behaves like any other unsigned integer type, providing the respective operators and automatic casts.
The true power of arbitrary-width integers feature is unleashed by using the IntVector class to store sequences of them. Instead of storing values in a byte-aligned way like standard vectors, IntVector stores them as a sequence of bits. This can dramatically reduce the size of vectors when the optimal bit width required for storing a single is not a power of two.
IntVector can be used with static or dynamic bit widths as explained in the following sections.
Static-width integer vectors
The bit width of values in static-width integer vectors is fixed at compile time. This is the standard behaviour if, for example, IntVector<uint_t<40>> is used for vectors of 40-bit integers.
A notable use case for this is the BitVector specialization, an alias for IntVector<uint_t<1>>, which effectively implements bit vectors.
The following example illustrates the use of IntVector in a static way:
// reserve a vector of 32 4-bit integers (initialized as zero)
IntVector<uint_t<4>> iv4(32);

// fill it with increasing values (0, 1, 2, ...)
std::iota(iv4.begin(), iv4.end(), 0);

// print size in bits
LOG(INFO) << "Size of iv4 in bits: " << iv4.bit_size();

// demonstrate overflow
ASSERT_EQ(iv4[0], iv4[16]);

// reserve an additional bit vector with 32 entries
BitVector bv(32);

// mark all multiples of 3
for(len_t i = 0; i < 32; i++) bv[i] = ((iv4[i] % 3) == 0);
This example also demonstrates how IntVector is implemented in a fully STL-compatible way.
Note how arbitrary-width integers overflow in the expected fashion: iv4[16] (which should be 16 according to std::iota) equals iv4[0] (which is zero).
Dynamic-width integer vectors
Using the specialization DynamicIntVector (which is an alias for IntVector<dynamic_t>), the bit width of values can be dynamically altered at runtime.
This is useful when the required width depends on previously processed input (e.g. a text length). It can also be used to bit-compress an integer vector after its initial construction.
The following is an example for the usage of DynamicIntVector:
// reserve a vector for 20 integer values (initialized as zero)
// default to a width of 32 bits per value
DynamicIntVector fib(20, 0, 32);

// fill it with the Fibonacci sequence
fib[0] = 0;
fib[1] = 1;
for(len_t i = 2; i < fib.size(); i++)
  fib[i] = fib[i - 2] + fib[i - 1];

// find the amount of bits required to store the last (and largest) value
auto max_bits = bits_for(fib.back());

// bit-compress the vector to the amount of bits required
fib.width(max_bits);
fib.shrink_to_fit();
Upon termination of this example, the vector will have a bit width of 13, which is the amount of bits required to store the 20th Fibonacci number (6,765).
The bits_for function is used to determine the amount of bits by computing the rounded-up binary logarithm. In the constructor and using width, the bit width of values within the DynamicIntVector can be altered at runtime. In order to achieve bit-compression, because the integer vector is internally backed by an array of 64-bit integers, a call to shrink_to_fit is necessary in order to actually shrink the vector's capacity.
Bit Vectors
As mentioned previously, the BitVector class (technically an alias for IntVector<uint_t<1>>) provides an implementation of bit vectors.
This section introduces some additional data structures on bit vectors that are available in tudocomp.
Rank and Select
The classes Rank and Select implement data structures for these widely used operations on bit vectors. Both are succinct, meaning that they allow constant-time queries with relatively low memory overhead. While Rank answers rank queries for 1-bits as well as 0-bits, Select has the two variants Select1 and Select0 (which work analogously).
The following example showcases the usage of these data structures:
// Construct a bit vector where every second bit is set
BitVector bv(128);
for(len_t i = 1; i < 128; i += 2) bv[i] = 1;

// Construct Rank and Select1 data structures
Rank    rank(bv);
Select1 select1(bv);

// Query the amount of 1-bits in the whole bit vector
ASSERT_EQ(64, rank.rank1(127));

// Query the amount of 0-bits in the whole bit vector
ASSERT_EQ(64, rank.rank0(127));

// Query the amount of 1-bits in the second half of the bit vector
ASSERT_EQ(32, rank.rank0(64, 127));

// Find the position of the first 1-bit
ASSERT_EQ(1,  select1(1));

// Find the position of the 32nd 1-bit
ASSERT_EQ(63, select1(32));

// Find the position of the 1000th 1-bit (which does not exist)
ASSERT_EQ(bv.size(), select1(1000));

// rank1(select1(i)) = i holds
for(len_t i = 1; i <= 64; i++) {
    ASSERT_EQ(i, rank(select1(i)));
}
For Rank, the functions rank1 and rank0 invoke the respective queries, while for Select, the operator() can be used as a shortcut. Note that Rank also provides the shortcut operator(), which is equal to calling rank1.
All operations expect zero-based indices, i.e., the position of the first bit in a bit vector is 0. Orders, on the other hand, are intuitively one-based i.e. the order of the 1st occurence of a bit is 1 (e.g. as the return value of rank or the input parameter of select). That said, select does not accept an input order of 0.
If for a parameter k, the kth occurence of a bit does not exist in the bit vector, select will return the bit vector's length instead, as a means of saying "out of scope".
Algorithms
The Algorithm class plays a central role in tudocomp as it provides the base for the modular system of compressors, coders and other classes - they all inherit from Algorithm.
This section introduces the core mechanisms one needs to understand in order to properly implement algorithms.
Meta Information
Any Algorithm implementation needs to provide meta information about itself in the form of a Meta object. For this, inheriting (non-abstract) classes are expected to expose a static function called meta. The following is a minimal example:
inline static Meta meta() {
    Meta m("example", "my_algorithm", "An example algorithm");
    return m;
}
The constructor takes three parameters:
- The algorithm's type
- The unique identifier for the algorithm
- A brief human-readable description of the algorithm
These parameters are used by the algorithm registry, which is explained further in the respective section below. For now, it is enough to understand that this information is later exposed to the command-line application.
Environment
When instantiated, an algorithm receives an environment object (Env) via its constructor. The environment provides access to algorithm options as explained below. It is retrieved using the env function.
A dummy environment can be created with the function create_env, passing a Meta object for initialization.
Options
Algorithms can accept optional parameters, or arguments. These can be passed via the command-line or when instantiating an algorithm.
Options are declared in the algorithm's Meta object using the option function like in the following example:
inline static Meta meta() {
    Meta m("example", "my_algorithm", "An example algorithm");
    m.option("param1").dynamic("default_value");
    m.option("number").dynamic(147);
    return m;
}
As visible in this example, options have basic type features. Only dynamic options are shown here, which can be seen as options with primitive data attached to them (e.g. a string or a numeric value).
At runtime, options can be accessed via the algorithm's environment:
// read options
auto& param1 = env().option("param1").as_string();
auto number = env().option("number").as_integer();
Because option values can be passed via the command-line, they are per se typeless. Using the conversion functions provided by the OptionValue class, they can be cast to the required type (in the example: as_string and as_integer).
Strategies
The true power of tudocomp's modularity comes from the ability to declare and pass strategies (or "sub algorithms") as algorithm options.
Assuming the algorithm implementation has been declared with a template parameter strategy_t, the following declares it as an option in the meta function:
m.option("strategy").templated<strategy_t>("my_strategy_t");The function templated determines that the option named "strategy" can be assigned with an object of the template type. It is expected that substitued types also inherit from Algorithm and provide a Meta object.
The additional constraint, "my_strategy_t", requires strategy algorithm to be of type "my_strategy_t". This corresponds to an Algorithm's type as reported by its Meta object.
Consider the following example function for the algorithm:
inline virtual int execute() override {
    // read number option as an integer
    auto number = env().option("number").as_integer();

    // instantiate strategy with sub environment
    strategy_t strategy(env().env_for_option("strategy"));

    // use strategy to determine result
    return strategy.result(number);
}
This function creates an instance of the template algorithm strategy_t. The instance receives a new environment, ie., the strategy can accept options of its own (example provded in the following section). The strategy is then used to compute a result value using a result function, that receives the "number" option as a parameter.
Instantiating Algorithms
Consider the following two strategies that both implement the result function as required by the example from the previous section:
// Strategy to compute the square of the input parameter
class SquareStrategy : public Algorithm {
public:
    inline static Meta meta() {
        // define the algorithm's meta information
        Meta m("my_strategy_t", "sqr", "Computes the square");
        return m;
    }

    using Algorithm::Algorithm; // inherit the default constructor

    inline int result(int x) {
        return x * x;
    }
};

// Strategy to compute the product of the input parameter and another number
class MultiplyStrategy : public Algorithm {
public:
    inline static Meta meta() {
        // define the algorithm's meta information
        Meta m("my_strategy_t", "mul", "Computes a product");
        m.option("factor").dynamic(); // no default
        return m;
    }

    using Algorithm::Algorithm; // inherit the default constructor

    inline int result(int x) {
        return x * env().option("factor").as_integer();
    }
};
Note how both strategies inherit from Algorithm and provide a Meta object. Both are of type my_strategy_t as required by the "strategy" option of the main algorithm.
SquareStrategy implements a simple result function that squares the input parameter, while MultiplyStrategy accepts another option named "factor", that is read and multiplied by the inpt parameter to compute the result.
The following example creates instances of the main algorithm from the previous section (called MyAlgorithm) with each of the strategies and computes the result values:
// Execute the algorithm with the square strategy
auto algo_sqr  = create_algo<MyAlgorithm<SquareStrategy>>("number=7");
algo_sqr.execute(); // the result is 49

// Execute the algorithm with the multiply strategy
auto algo_mul5 = create_algo<MyAlgorithm<MultiplyStrategy>>("number=7, strategy=mul(factor=5)");
algo_mul5.execute(); // the result is 35
create_algo takes an algorithm type as a template parameter, in this case MyAlgorithm populated with the respective strategies. The string parameter contains the command-line options to be passed to the algorithm.
For SquareStrategy, the "number" option is simply set to 7, ie. the result of execute using this strategy will be 7 * 7 = 49.
For MultiplyStrategy, note how the "strategy" option is assigned the value of mul(factor=5). A recursion takes place here: mul is the identifier of the MultiplyStrategy as exposed by its Meta information. It accepts the "factor" option, which is assigned the number 5. Thus, the result of execute in this case will be 7 * 5 = 35.
The Algorithm Registry
The ability of passing algorithms as command-line strings becomes most interesting when a Registry for algorithms gets added to the mix. Note how in the previous section's example, create_algo is called with fixed template types. A registry can be used to map string identifiers to actual types to obscure fixed typing.
The following example creates a registry and registers the example algorithm with the two strategies. It is then used to instantiate both versions without the need of fixed typing:
// Create a registry for algorithms of type "example"
Registry<MyAlgorithmBase> registry("example");

// Register two specializations of the algorithm
registry.register_algorithm<MyAlgorithm<SquareStrategy>>();
registry.register_algorithm<MyAlgorithm<MultiplyStrategy>>();

// Execute the algorithm with the square strategy
auto algo_sqr = registry.select("my_algorithm(number=5, strategy=sqr)");
algo_sqr->execute(); // the result is 25

// Execute the algorithm with the multiply strategy
auto algo_mul = registry.select("my_algorithm(number=5, strategy=mul(8))");
algo_mul->execute(); // the result is 40
Note that for this example, the interface MyAlgorithmBase was introduced, which MyAlgorithm inherits from. It merely declares the virtual function execute. The additional layer of abstraction is necessary only for use as a template parameter for the Registry class in this example.
Coders
Coders serve for encoding primitve data types into a bit sequence with limited context. This is contrary to compressors, which may have random access the entire input sequence.
They only have a limited context that is determined by a controlling entity - most commonly a compressor. This context consists of value ranges and information on the input alphabet.
While compressors should provide as much context information as possible, it is up to the coder to actually make use of it or only parts of it.
Ranges
The Range class serves as a representation of value ranges, ie., a minimum and a maximum value. Having information on the range that a certain value is contained in can help to encode the value in an efficient manner, namely using less bits.
For example, if a value x should be encoded and it is known to that 1024 <= x < 1088, the coder could make use of this information in various ways:
- Encode only the difference dx = x - 1024.
- Encode the difference using only 6 bits (because dx < 64 holds).
- If it is also known that x tends to be distributed towards the minimum value, use variable-width encoding for dx.
- ...
tudocomp provides several classes of ranges that should be used as precisely as possible in order to provide the best possible context information to coders:
| Class | Description |
|---|---|
Range |
A simple min-max-range with no particular distribution. |
MinDistributedRange |
Values tend to be distributed towards the minimum. |
BitRange |
Values are either 0 or 1. |
TypeRange<T> |
Values are of a certain integer type T. |
LiteralRange |
Values are literals (of type uliteral_t, see below). |
For literals, that is, characters of the input alphabet (commonly represented using the uliteral_t type), LiteralRange / uliteral_r serves a special purpose and should be favored. The following section on literal iterators will provide more information.
tudocomp also predefines global instances for some fixed common ranges: uliteral_r for LiteralRange, len_r for TypeRange<len_t> and bit_r for BitRange.
Literal Iterators
Another useful piece of context information for coders may be about the input alphabet, that is, the characters or bytes (henceforth called "literals") that occur and where they occur. This information can be used for low-entropy coding, with the most prominent example being Huffman codes.
In order to provide coders with information on the input literals, tudocomp offers the concept of a LiteralIterator. The literal iterator must define the two functions has_next and next to navigate over the input literals. The latter yields Literal objects, which contain an observed literal as well as a position at which it occurs.
The most simple form of a literal iterator would report every literal from the input in sequential order along with their position. For example, for the input text "aba", it would yield the following Literal objects (represented as tuples of literal and position of occurence: (a,1), (b,2), (a,3). This most simple behavior is implemented in the ViewLiterals class.
However, there are situations where this does not correspond to the literal occurences of an already processed input. A simple example is the LZ77 factorization of a text: Some literals have been replaced by factors and would, if still counted, distort the distribution of literals for a Huffman encoding. Therefore, the literal iterator that a LZ77 compressor passes to its encoder would skip any literal that has been replaced by a factor, in order to allow for a better low-entropy encoding afterwards. This commonly results in more complex implementations of the aforementioned functions has_next and next.
For some scenarios, especially during development, the NoLiterals iterator can be used to give no input alphabet information to the coder at all. Note that low-entropy encoders, which may rely on this information, may not be compatible with this.
The Coder Interface
tudocomp does not provide a central base for coders, but separates their functionality by providing an Encoder and a Decoder class.
It is expected that for any encoder, there is a corresponding decoder that restores the original output. In order to enforce this, encoder and decoder implementations are typically encapsulated in an outer Coder class that inherit from Algorithm. This design pattern allows for separation of encoding and decoding functionality while retaining the ability to instantiate both from a template type (ie. the outer class).
Apart from this concept, encoders and decoders are simple classes that declare the function templates encode and decode, respectively. Their template parameters are generally expected to be numeric types.
Both encode and decode accept a Range as an argument. As discussed in the Ranges section above, the range information can be used to encode a given value in a more efficient manner. The following example uses the range in order to perform a binary encoding of the given value:
template<typename value_t>
inline void encode(value_t v, const Range& r) {
    // Compute the amount of bits required to store a value of range r
    auto delta_bits = bits_for(r.delta());

    // Encode the value as binary using the computed amount of bits
    v -= r.min();
    m_out->write_int(v, delta_bits);
}
The range's delta is a convenience function that yields the difference between the range's max and min functions. In the example, the amount of bits required to store delta as binary is computed using the already known function bits_for. Then, only the difference between the passed value and the range's minimum value is actually encoded.
The corresponding decoding function would be implemented in the following way:
template<typename value_t>
inline value_t decode(const Range& r) {
    // Compute the amount of bits required to store a value of range r
    auto delta_bits = bits_for(r.delta());

    // Decode the value from binary reading the computed amount of bits
    value_t v = m_in->read_int<value_t>(delta_bits);
    v += r.min();
    return v;
}
Again, the amount of bits for the range's delta is computed and the difference of the stored value and the minimum is decoded. In a final step, naturally, the range's minimum has to be added back in order to restore the original value.
Note that the decoder relies on its controller (e.g. a compressor) to provide the correct range information. In order for the above example to work, the same range has to be used to encode and decode each value.
Range Overloads
In order to realize a different behavior for different types of ranges (as presented in the Ranges section), overloads of encode and decode are used. These overloads only differ to the default signature in that they accept more specialized Range objects. The following example realizes an ASCII encoding for single bits, as identified by the BitRange:
template<typename value_t>
inline void encode(value_t v, const BitRange&) {
    // Encode single bits as ASCII
    m_out->write_int(v ? '1' : '0');
}
The same idea works with decoding:
template<typename value_t>
inline value_t decode(const BitRange&) {
    // Decode an ASCII character and compare against '0'
    uint8_t b = m_in->read_int<uint8_t>();
    return (b != '0');
}
Note that there is no virtual inheritance, and therefore no polymorphism, between the different range types. This may be a pitfall when trying to introduce new range types. Also note that the default Encoder and Decoder implementations provide overloads for the default Range (which do binary coding like above) as well as BitRange (which writes single bits).
Using Literal Iterators
Encoders accept a literal iterator (see Literal Iterators) via their constructor. The following simple example uses the literal iterator to count the amount of occurences of each possible literal (0 to 255) in the input:
// count occurences of each literal
std::memset(m_occ, 0, 256 * sizeof(int));

while(literals.has_next()) {
    Literal l = literals.next();
    ++m_occ[l.c];
}
Interleaved Coding
In order to achieve better (smaller) results, multiple encoders could be used for different scenarios. For example, when encoding a LZ78 factorization, one could use binary coding for a factor ID, and Huffman coding for the appended literal. This is called interleaved coding, since both encoders would write to the same bit output stream.
Interleaved coding is currently not fully supported by tudocomp. The issue here is that coders may "absorb" a certain amount of literals before deciding what to encode (e.g. run-length encoders). When a different encoder writes values in the meantime, the output may be corrupted.
A solution for this issue is planned for the near future.
Available Coders
Out of the box, tudocomp currently implements a set of coders, including:
- Human readable coding (ASCII, for debugging purposes)
- Binary coding
- Universal codes (e.g. Elias codes)
- Statistic codes (e.g. Huffman code)
A full list can be found in the inheritance diagram for the Encoder class' API reference.
Compressors
Compressors transform an input into an output that can be losslessly restored to the original input. What conceptually separates them from Coders is that compressors may have random access on the entire input and use this to find information on how to achieve compression. Apart from being able to use properties of the input for compression, they can build a context for one or multiple coders to in order to encode single values efficiently.
On a code level, the (abstract) Compressor class serves as the foundation for compression algorithm implementations. It declares the two virtual functions compress and decompress with the same signature: both receive an Input to read from and an Output to write to (see Input and Output section). In a single compression cycle the output produced by decompress must match the input received by compress.
Compressors also inherit from Algorithm (see Algorithms section, ie., they must provide a meta information object, they own an environment to accept options, and they can be implemented in a modular way using strategies for certain sub-task. For instance, most commonly, encoding is done using a Coder as a strategy.
The following code example provides a simple compressor implementation that uses an encoding strategy.
// Implement a simple compressor
template<typename coder_t>
class MyCompressor : public Compressor {
public:
    inline static Meta meta() {
        Meta m("compressor", "my_compressor", "An example compressor");
        m.option("coder").templated<coder_t>("coder");
        return m;
    }

    using Compressor::Compressor;

    virtual void compress(Input& input, Output& output) override {
        // retrieve random access on the input
        auto view = input.as_view();

        // find the lexicographically smallest and largest characters
        uliteral_t c_min = ULITERAL_MAX;
        uliteral_t c_max = 0;

        for(uliteral_t c : view) {
            c_min = std::min(c_min, c);
            c_max = std::max(c_max, c);
        }

        // instantiate the encoder using the whole input alphabet
        typename coder_t::Encoder coder(
            env().env_for_option("coder"), output, ViewLiterals(view));

        // encode the smallest and largest characters
        coder.encode(c_min, uliteral_r);
        coder.encode(c_max, uliteral_r);

        // define the range for all occuring characters
        Range occ_r(c_max - c_min);

        // encode text
        for(uliteral_t c : view) {
            coder.encode(c - c_min, occ_r);
        }
    }

    /* decompress - see source file */
};
The presented compression algorithm is very simple:
- Determine the lexicographically smallest and largest characters
c_minandc_maxin the input text (using a simple linear scan). - Instantiate an encoder for the whole input alphabet (
ViewLiterals). - Store
c_minandc_maxto the output by encoding them using the literal rangeuliteral_r. - Define a range that covers values from 0 to
c_max - c_minas a hint for the encoder. - Encode only the difference
c - c_minbetween each charactercfrom the input and the smallest one,c_min, using the previously defined range.
Note that this simple type of compression could as well be implemented as a coder (because it only requires the input alphabet as a context), but it already shows the two typical major phases of a compression routine:
Firstly, it scans the input - possibly multiple times - and stores information about how to compress the text (in this case by determining the alphabet bounds). Secondly, the input is encoded to a compressed output using that information (in this case by shrinking the character values to the minimally required interval).
The decompression simply reverses this by first decoding c_min and c_max, then decoding character by character using the same range that was used in the compression.
The meta information declares the compression algorithm's type as compressor. This is important for the command-line application, which considers algorithms of this type only for exposition.
Available Compressors
Out of the box, tudocomp currently implements a set of compressors, including:
- Lempel-Ziv based compressors (LZ77, LZ78 and variants)
- Grammar-based compressors (RePair)
- A bzip chain (Burrows-Wheeler transform, move-to-front and run-length coding)
These compressors are implemented in a modular way, making sub-task solvers reusable and allowing for swift development of alternative strategies.
A full list can be found in the inheritance diagram for the Compressor class' API reference.
Compressor Test Helpers
tudocomp provides some help utilities to quickly implement unit tests for compressors, most prominently the function test::roundtrip, which performs the following operations: It
- instantiates the given compressor type (template),
- passes the input string to the
compressmethod, - tests the compression result against an optional expected result,
- passes the compression result to the
decompressmethod and - tests the decompression result against the original input string.
This way, it spans an entire compression cycle for a given text.
The following two function templates provide one more utility for tests on a variety of strings:
test::roundtrip_batchruns a function for a set of short border case strings like the empty string, runs of a single character, simple repetitions, unicode etc.test::on_string_generatorsruns a function for a set of strings generated by tudocomp's stock string generators (see String Generators section for more information).
In combination with the roundtrip function, these can be used to quickly run a range of compression cycle tests as in the following example:
// perform border case compression tests using different encoders
test::roundtrip_batch(test::roundtrip<MyCompressor<ASCIICoder>>);
test::roundtrip_batch(test::roundtrip<MyCompressor<BitCoder>>);
test::roundtrip_batch(test::roundtrip<MyCompressor<EliasDeltaCoder>>);

// perform compression tests on generated strings using different encoders
test::on_string_generators(test::roundtrip<MyCompressor<EliasDeltaCoder>>, 15);
test::on_string_generators(test::roundtrip<MyCompressor<BitCoder>>, 15);
test::on_string_generators(test::roundtrip<MyCompressor<ASCIICoder>>, 15);
The example first executes roundtrip tests for the example compressor and different encoders, on both border case strings and then strin generators.
Note that the second parameter passed to on_string_generators is passed further to the respective generators to generate, e.g., the 15th Fibonacci string or the 15th Thue Morse word. It should therefore not be chosen too high.
Magic
For decompression, it is important to identify what compressor has been used to produce a compressed output - often called a "magic" keyword.
It is intended by tudocomp that this is not the responsibility of a compressor to prepend this information to the output, but it is the application that has to take care of this.
String Generators
String generators are used to generate input strings via the command-line (as described in the Command-line Tool section) or for unit tests, to name some examples.
They are based on the Generator class, which inherits from Algorithm (see Algorithms) and only need to implement the generate function.
In order to allow for convenient use within tudocomp, the actual generation should be implemented in a static function that receives all parameters directly instead of relying on an environment.
The following class fully implements a string generator that simply repeats an optional character an optional amount of times:
class MyGenerator : public Generator {
public:
    inline static Meta meta() {
        Meta m("generator", "my_compressor", "An example compressor");
        m.option("length").dynamic();
        m.option("char").dynamic('a');
        return m;
    }

    inline static std::string generate(size_t length, char c) {
        return std::string(length, c);
    }

    using Generator::Generator;

    inline virtual std::string generate() override {
        return generate(
            env().option("length").as_integer(),
            env().option("char").as_integer());
    }
};
Available String Generators
Out of the box, tudocomp currently implements a set of string generators, including:
- Random strings with uniform character distribution
- Fibonacci words
- Thue-Morse strings
- Run-Rich strings (Matsubara et al.)
A full list can be found in the inheritance diagram for the Generator class' API reference.
Runtime Statistics
tudocomp provides functionality to measure the running time and the amount of dynamically allocated memory (e.h. via malloc or new) over the application lifetime.
Runtime statistics are tracked in phases, ie. the running time and memory peak can be measured for individual stages during an algorithm's run. These phases may be nested, ie., a phase can consist of multiple other phases. When using the tudocomp command-line tool, a root phase is automatically started immediately before the selected algorithm starts.
The measured data can be retrieved in a JSON representation in order to visualize it using the tudocomp Charter or to process in a third-party application.
Statistics tracking is implemented by the StatPhase class. By creating a StatPhase object, a new phase is started. The constructor accepts the phase's title as a string. The phase ends either when the object is destroyed (e.g. when it runs out of scope) or when the phase is split (see below). Any code executed within a phase is subject to time and memory measurement.
In order to receive meaningful results, each phase should "clean up" properly, ie., it should free any memory that is no longer needed after the phase is finished. This can be achieved using scopes, but the StatPhase class also offers a way to enforce clean phase-based programming using the StatPhase::wrap functor. It receives a lambda that implements the phase and is allowed to return a result to the outer program flow.
The following example runs through a few different phases with different processing times and memory allocations (for demonstration purposes, this is realized using sleeping and simply array allocations):
StatPhase root("Root");

// Phase 1
StatPhase::wrap("Phase 1", []{
    char* alloc1 = new char[2048];
    std::this_thread::sleep_for(std::chrono::milliseconds(30));
    delete[] alloc1;
});

// Phase 2
StatPhase::wrap("Phase 2", []{
    char* alloc2 = new char[3072];

    // Phase 2.1
    StatPhase::wrap("Phase 2.1", []{
        std::this_thread::sleep_for(std::chrono::milliseconds(30));

        StatPhase::log("A statistic", 147);
        StatPhase::log("Another statistic", 0.5);
    });

    // Phase 2.2
    StatPhase::wrap("Phase 2.2", []{
        char* alloc2_2 = new char[1024];
        std::this_thread::sleep_for(std::chrono::milliseconds(40));
        delete[] alloc2_2;
    });

    delete[] alloc2;
});

// Print data in JSON representation to stdout
root.to_json().str(std::cout);
During any phase, custom statistics can be logged using the StatPhase::log method.
As seen in the last line, the JSON representation of the measured data can be retrieved using the to_json function. For the above example, the following JSON output is produced:
{
    "memFinal": 0,
    "memOff": 0,
    "memPeak": 4096,
    "stats": [],
    "sub": [{
        "memFinal": 0,
        "memOff": 0,
        "memPeak": 2048,
        "stats": [],
        "sub": [],
        "timeEnd": 3330592,
        "timeStart": 3330562,
        "title": "Phase 1"
    },{
        "memFinal": 0,
        "memOff": 0,
        "memPeak": 4096,
        "stats": [],
        "sub": [{
            "memFinal": 0,
            "memOff": 3072,
            "memPeak": 0,
            "stats": [{
                "key": "A statistic",
                "value": "147"
            },{
                "key": "Another statistic",
                "value": "0.500000"
            }],
            "sub": [],
            "timeEnd": 3330623,
            "timeStart": 3330592,
            "title": "Phase 2.1"
        },{
            "memFinal": 0,
            "memOff": 3072,
            "memPeak": 1024,
            "stats": [],
            "sub": [],
            "timeEnd": 3330663,
            "timeStart": 3330623,
            "title": "Phase 2.2"
        }],
        "timeEnd": 3330663,
        "timeStart": 3330592,
        "title": "Phase 2"
    }],
    "timeEnd": 3330663,
    "timeStart": 3330562,
    "title": "Root"
}
Iterative Phases
In some cases, phases of an algorithm compute complex results and would make it complicated to express them in a single lambda return statement. In other use cases, one may want to end a phase and begin a new phase within loop iterations in order to visualize progress.
For these purposes, a phase can be "split" using the split function. Splitting causes the current phase to end and a new phase to begin immediately. The following example demonstrates phase splitting:
// Phase 3 (splitting)
StatPhase::wrap("Phase 3", []{
    // Phase 3.1 yields a complex result
    StatPhase sub_phase("Phase 3.1");

    char* result_part_1 = new char[1024];
    char* result_part_2 = new char[2048];
    std::this_thread::sleep_for(std::chrono::milliseconds(40));

    // Phase 3.2 may use the result
    sub_phase.split("Phase 3.2");
    delete[] result_part_2;
    delete[] result_part_1;
    std::this_thread::sleep_for(std::chrono::milliseconds(60));
});
Pausing and Resuming Memory Tracking
There may be situations where the measurement of certain data structures is not desired, e.g., if they only serve as temporary helpers during development. Memory tracking can be paused and resumed during any phase using the StatPhase::pause_tracking and StatPhase::resume_tracking functions, as demonstrated in the following snippet:
// Allocate memory, but only track mem2
StatPhase::pause_tracking();
char* mem1 = new char[1024];
StatPhase::resume_tracking();

char* mem2 = new char[2048];

// Sleep
std::this_thread::sleep_for(std::chrono::milliseconds(100));

// Free memory, but only track mem2
StatPhase::pause_tracking();
delete[] mem1;
StatPhase::resume_tracking();

delete[] mem2;
Charter Web Application
The tudocomp Charter is a JavaScript-based web application that visualizes the statistics JSON output. Based on the data, it plots a bar chart that displays the single phases of the compression run with their running time on the X axis and their peak heap memory usage on the Y axis.
The following figure shows the diagram corresponding from the JSON snippet from the previous section.
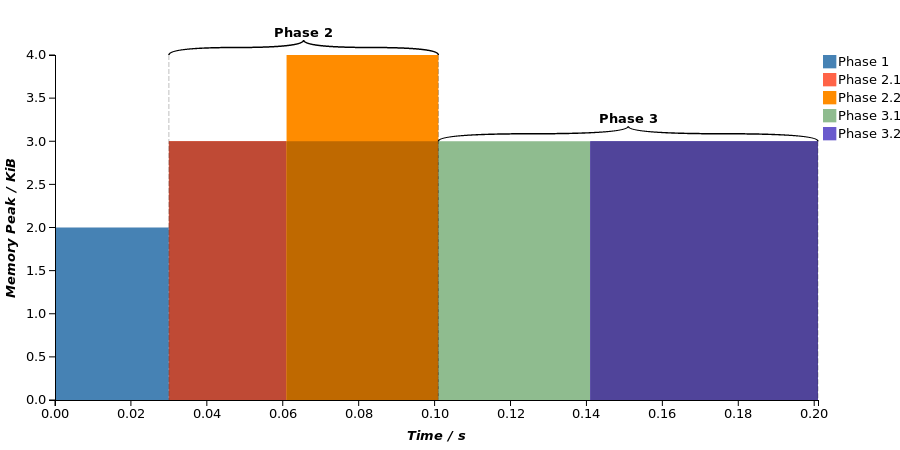
A diagram plotted by the Charter.
Observe the bar corresponding to Phase 2.2: The shaded area within the phase bar visualizes the memory offset of the phase, ie., how much memory was already allocated at the beginning of the phase. Alas, the top border of the bar displays the global, application-wide memory peak during the phase, while the phase's local memory peak is the difference between the whole and the shaded area.
This information is explicitly printed in table view below the diagram. This is also where custom statistics are printed. The table view of a phase will also be displayed as a tooltip when the mouse is moved over its bar in the diagram.
The Charter provides several options to customize the chart, as well as exporting it as either a vector graphic (svg) or an image file (png).
Text Corpus
For testing and benchmarking purposes, tudocomp provides a utility to automatically download or generate a text corpus. To allow better comparisons, it creates several prefixes of the included texts (eg, 200 MiB, 100 MiB, 50 MiB, ...).
At the moment of this writing, tudocomp defines two sets of texts: datasets, with a upper size bound of ~200MiB per text, and large_datasets, with a upper size bound of ~10GiB per text.
The exact list of provided texts can be reviewed and changed with the config files etc/datasets_config.py and etc/large_datasets_config.py.
The 200MiB collection includes the tagme and hashtag datasets from the Lab of Advanced Algorithms and Applications, as well as the Pizza&Chili Corpus (identified by the prefixes pc and pcr below).
The following collections have been generated by tudocomp itself:
commoncrawl- composition of a random subset of common crawl, containing only the plain text (i.e., excluding header and markup) of websites in ASCII format.wiki-all-vital- plain text composition of about 10,000 of the most vital Wikipedia articles.
The following table contains information relevant for text compression on some of the included texts:
| Text | σ | max lcp | avg lcp | bwt runs | z | max LZ77 factor | H0 | H1 | H2 | H3 |
|---|---|---|---|---|---|---|---|---|---|---|
hashtag |
179 | 54,075 | 84 | 63,014K | 13,721K | 54,056 | 4.59 | 3.06 | 2.69 | 2.46 |
pc-dblp.xml |
97 | 1,084 | 44 | 29,585K | 7,035K | 1,060 | 5.26 | 3.48 | 2.17 | 1.43 |
pc-dna |
17 | 97,979 | 60 | 128,863K | 13,970K | 97,966 | 1.97 | 1.93 | 1.92 | 1.92 |
pc-english |
226 | 987,770 | 9390 | 72,032K | 13,971K | 987,766 | 4.52 | 3.62 | 2.95 | 2.42 |
pc-proteins |
26 | 45,704 | 278 | 108,459K | 20,875K | 45,703 | 4.20 | 4.18 | 4.16 | 4.07 |
pcr-cere |
6 | 175,655 | 3541 | 10,422K | 1,447K | 175,643 | 2.19 | 1.81 | 1.81 | 1.80 |
pcr-einstein.en |
125 | 935,920 | 45983 | 153K | 496K | 906,995 | 4.92 | 3.66 | 2.61 | 1.63 |
pcr-kernel |
161 | 2,755,550 | 149872 | 2,718K | 775K | 2,755,550 | 5.38 | 4.03 | 2.93 | 2.05 |
pcr-para |
6 | 72,544 | 2268 | 13,576K | 1,927K | 70,680 | 2.12 | 1.88 | 1.88 | 1.87 |
pc-sources |
231 | 307,871 | 373 | 47,651K | 11,542K | 307,871 | 5.47 | 4.08 | 3.10 | 2.34 |
tagme |
206 | 1,281 | 26 | 65,195K | 13,841K | 1,279 | 4.90 | 3.77 | 3.20 | 2.60 |
wiki-all-vital |
205 | 8,607 | 15 | 80,609K | 16,274K | 8,607 | 4.56 | 3.62 | 3.03 | 2.45 |
commoncrawl |
115 | 246,266 | 1727 | 45,899K | 10,791K | 246,266 | 5.37 | 4.30 | 3.55 | 2.78 |
Legend:
- σ is the alphabet size, i.e., the amount of distinct symbols occuring in the text.
- max lcp is the maximum value in the text's longest common prefix array.
- avg lcp is the average of all longest common prefix array values.
- bwt runs is the number of runs in the Burrows-Wheeler transform of the text (i.e., how often
BWT[i] != BWT[i-1]occurs). - z is the number of LZ77 factors (n window) for the text.
- max LZ77 factor is the length of the longest LZ77 factor (no window).
- Hk is the k-th order entropy of the text.
Downloading the Text Corpus
The following make command will download all of the 200MiB text corpii listed above into the repository's etc/datasets directory:
$ make datasetsThe same holds true for the larger texts:
$ make large_datasetsThe Comparison Tool
tudocomp contains a utility to compare running time, memory usage and compression rate for a range of compressors, called the comparison tool. It comes in the form of a Python 3 script located at etc/compare.py. Note that it prints a usage description when passing the --help parameter.
The tool uses valgrind to measure the memory actually used by a process. Therefore, recall at this point the restrictions when using it in a Windows environment (see Windows Support).
The comparison tool will perform the following steps for each input file and each compressor defined in the comparison suite (more details on suites follows further below):
- Compress the input file and measure the compressor's running time
- Compress the input file while measuring the compressor's memory usage
- Compute the compression rate (size of output file divided by the input file's size).
- Decompress the output file and measure the decompressor's running time
- Decompress the output file while measuring the decompressor's memory usage
- Compare the decompressor's output against the original input file
Memory measurement via valgrind slows the process down significantly, which is why the compressor / decompressor is executed twice in order to measure time and memory, respectively. In case valgrind is unavailable, memory measurement will not take place.
The gathered data is printed as a table like in the following example:
File: datasets/pc_dna.1MB (1.0MiB, sha256=b668b098927d32c5a239aef82dba6d45a034a205e64bf153810a5fe6f88fe196)

 Compressor |   C Time |  C Memory |    C Rate |   D Time |  D Memory |  chk |
------------------------------------------------------------------------------
    gzip -1 |   33.0ms |    6.6MiB |  32.4776% |   22.5ms |    6.6MiB |   OK |
    gzip -9 |  711.0ms |    6.6MiB |  27.2440% |   10.2ms |    6.6MiB |   OK |
   bzip2 -1 |  123.5ms |    9.3MiB |  26.6178% |   51.9ms |    8.7MiB |   OK |
   bzip2 -9 |  124.4ms |   15.4MiB |  26.1772% |   58.7ms |   11.7MiB |   OK |
    lzma -1 |  120.3ms |   23.3MiB |  28.8488% |   30.9ms |   15.8MiB |   OK |
    lzma -9 |  763.0ms |  687.8MiB |  24.7587% |   26.5ms |   78.8MiB |   OK |
The columns have the following meaning:
- Compressor: display name of the compressor as defined in the comparison suite (see below)
- C Time: running time of the compressor
- C Memory: memory usage of the compressor
- C Rate: compression rate (output size divided by input size)
- D Time: running time of the decompressor
- D Memory: memory usage of the decompressor
- chk:
OKif the decompessed file equals the original file (tested by comparing their respective SHA256 hashes), otherwiseFAIL
Multiple iterations can be performed per file (by passing the -n parameter). In this case, the respective median values of all iterations will be printed.
Comparison Suites
A comparison suite defines a range of compressor pairs to be compared. A compressor pair consists of a display name for the tabular output, as well as information on how to invoke the compressor and decompressor on a command-line level (ie. command, arguments, and how input / output is passed to them).
These suites are stored in files that can be selected by passing the --suite parameter, followed by the path to the suite file, to the comparison tool.
Technically speaking, a suite file must contain a valid Python statement that resolves to a list of CompressorPair objects. These are (named) tuples of a string (the display name) and two Exec objects that define the command-line interface for the compressor and decompressor, respectively. To that end, Exec contains the command-line to execute as well as means to pass input and output file information.
The following example defines a small suite for comparing gzip against a tudocomp implementation of LZ77 with subsequent Huffman coding:
[
# gzip -1
CompressorPair(name = 'gzip',
    compress   = Exec(args=['gzip', '-1'], inp=StdIn, outp=StdOut),
    decompress = Exec(args=['gzip', '-d'], inp=StdIn, outp=StdOut)),

# tudocomp with LZSS/LCP and Huffman
CompressorPair(name = 'tdc_lzss_lcp_huff',
    compress   = Exec(args=['./tdc', '-a', 'lzss_lcp(threshold=20,coder=huff)'],
                      outp='--output'),
    decompress = Exec(args=['./tdc', '-d'], outp='--output'))
]
As noted above, an Exec object contains the basic command-line to invoke a compressor or decompressor as a string list in the args parameter. The parameters inp and outp define how input and output files are passed to the application. They have the following possible states (values):
- If
outpequalsStdOut, it is expected that the application prints its output to the standard output stream. In this case, the comparison tool pipes it into a file. - Similarly, when
inpequalsStdIn, the input file is piped into the application via standard input. - In case of a string value, it is used as an additional command-line parameter followed by the file name (e.g. for
--outputin the example above,--output FILENAMEis appended to the command-line). - If unset (
None), only the file name is appended to the command-line.
The two helper functions Tudocomp and StdCompressor facilitate the definition of tudocomp command-lines and the standard Linux compressors, which read from stdin and write to stdout. They can be used to abbreviate the suite from the example above to the following:
[
# gzip -1
StdCompressor(name='gzip',
    binary='gzip', cflags=['-1'], dflags=['-d']),

# tudocomp with LZSS/LCP and Huffman
Tudocomp(name='tdc_lzss_lcp_huff',
    algorithm='lzss_lcp(threshold=20,coder=huff)'),
]
Note that by default, the tudocomp binary is expected at ./tdc, therefore the comparison tool should be run from a build directory.
Manual
The LZ78/LZW Implementation
Tudocomp contains an implementation of both Lz78 and Lzw. Both are implemented according to their basic definitions: A sequence of characters is being read from a input stream, and a dictionary is searched for a longest previously-seen prefix of characters. The dictionary is updated as needed, and lz factors containing references to the found prefixes are being output.
The Algorithms are defined in terms of two abstract interfaces, implemented as C++ concepts:
LZ78Trie. It abstracts over a concrete dictionary data structure with a trie-like interface and search API, and is used by both Lz78 and Lzw, despite its name.Coder. It abstracts over the concrete encoding of a sequence of integer values, in this case the references and characters in a lz factor.
The trie interface is explained in more details below. For details to the Coder interface, see the Tutorial section above.
Both algorithms also support limiting the dictionary to a certain maximum size, to reduce memory consumption and search overhead at the cost of compression rate. Concretely, this is defined by clearing the dictionary once it reaches a specific size, leading to multiple rebuilds of the data structure during a Lz78/Lzw run.
Note: The dictionary-limiting option is currently disabled due to bugs with a few of the existing dictionary implementations.
Algorithm API
Both the compressors and the different dictionaries are registered as Algorithms in Tudocomps registry. The full list of existing implementations can bee seen with ./tdc --list. For example:
To compress input.txt with Lz78 using the BinaryTrie:
./tdc -a "lz78(lz78trie = binary)" input.txtTo compress input.txt with Lzw using a limited dictionary size of 1024 entries:
./tdc -a "lzw(dict_size = 1024)" input.txtSource Location
The Lz78 and Lzw implementations can be found in include/tudocomp/compressors/LZ78Compressor.hpp and include/tudocomp/compressors/LZWCompressor.hpp, respectively.
Support definitions and the Trie base class can be found in include/tudocomp/compressors/lz78/LZ78Trie.hpp. The same directory also contains all existing LZ78Trie implementations.
The LZ78Trie interface.
In order to fulfill the LZ78Trie interface, a class T needs to:
- Implement Tudocomps
Algorithmconcept, for which it needs to:- Public inherit from
Algorithm. - Call the
Algorithm(Env&&)constructor. - Be movable and move-assignable.
- Implement a
inline static Meta meta();describing the Algorithm.
- Public inherit from
- Public inherit from
LZ78Trie<>.- Optionally, instead inherit from
LZ78Trie<my_node_type_t>with a custom node typemy_node_type_t(see below).
- Optionally, instead inherit from
- Call the
LZ78Trie(const size_t n, const size_t& remaining_characters)constructor. Implement the following constructor and methods:
inline T(Env&& env, const size_t n, const size_t& remaining_characters, size_t reserve = 0);
inline node_t add_rootnode(uliteral_t c);
inline node_t get_rootnode(uliteral_t c) const;
inline node_t find_or_insert(const node_t& parent, uliteral_t c);
inline void clear();
inline size_t size() const;
where
node_tis a type member provided by the parentLZ78Trie<X>that describes a node in the trie, and is equal toX. It defaults toLZ78TrieNode, see below for more details.
These members should have the following semantics:
- The constructor should delegate its arguments to the two base constructors mentioned above, and try to reserve memory for
reserve-many dictionary entries. add_rootnode(x)should create a root node in the trie that corresponds to the lz node with labelx. For Lz78, this will be called once with argument 0. For Lzw, this will be called for all possible character values (the byte values 0 to 255). An implementation may choose how it maps these logical root nodes to the actual data structure. A common approach is to have a hidden single real root node, with the logical root nodes living on the first layer below it. See the graphic below.get_rootnode(x)should return the same node as created by the correspondingadd_rootnode(x)call.find_or_insert(parent, c)should search the nodeparentfor a child with edge labelc, create one if it doesn't exist, and then return it.clear()should reset the data structure entirely, including root nodes.size()should return the number of nodes in the data structure, including root nodes.
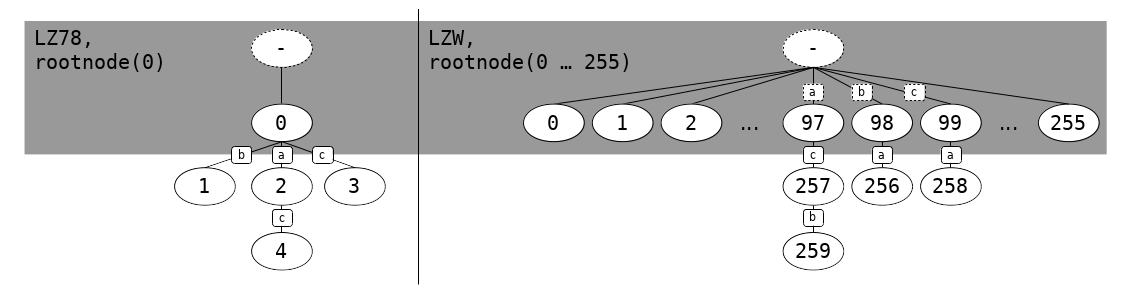
LZ78 and LZW Trie for the string "bacacb"
node_t and custom node types
node_t is per default identical to LZ78TrieNode, and behaves like a (integer, bool) tuple with the following API:
inline node_t(factorid_t id, bool is_new);
inline node_t();
inline factorid_t id() const;
inline bool is_new() const;
id() returns the node label, and is_new() is true if this node has been freshly created by find_or_insert().
Usually, just having the node label is enough for a LZ78Trie implementation to locate a node in its internal data structure. In cases where that is not possible though, say if you need the internal address of an node, you can replace the default node_t type with a custom one by passing it to the template argument of the LZ78Trie<...> parent class.
Such a type needs to provide the same API as LZ78TrieNode, but may:
- Have a custom constructor.
- Have additional members (for example, storing an internal node address).
The easiest way to do this is by inheriting from LZ78TrieNode. See include/tudocomp/compressors/lz78/CedarTrie.hpp for an example of how this is done.
Note that InkScape versions prior to 0.92 do not properly support the positioning of texts using CSS. Therefore, when older versions are used to import SVGs generated by tudocomp, texts will not be positioned correctly.↩
valgrindreportedly fails starting in Bash on Ubuntu on Windows before the Creators Update. The issue had been filed officially here.↩Currently, direct streaming from an
std::istreamis not supported. When anInputis constructed from anistream, the stream is fully read and buffered in memory. This is an implementation decision that may change in the future. Note that files, on the other hand, are not buffered and will always be streamed from disk directly.↩